- Published on
MongoDB 101
- Authors

- Name
- Somprasong Damyos
- @somprasongd
MongoDB 101
MongoDB เป็นระบบฐานข้อมูลแบบ NoSql ซึ่งจะจัดเก็บข้อมูลในรูปแบบ document ที่เรียกว่า BSON (คล้าย JSON objects)
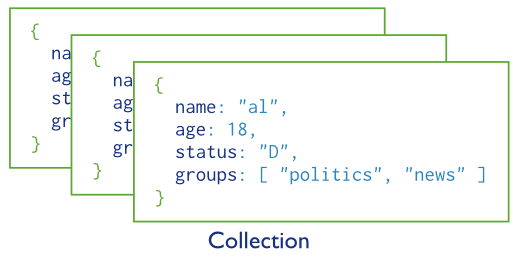
โดย data records จัดจะเก็บเป็น BSON Documents ซึ่งจะอยู่ใน Collections (เทียบเท่า Table) ที่อยู่ใน databases แต่ละตัว
SQL to MongoDB Mapping Chart
| SQL Terms/Concepts | MongoDB Terms/Concepts |
|---|---|
| database | database |
| table | collection |
| row | document or BSON document |
| column | field |
| index | index |
| table joins | embedded documents and linking |
| primary key (Specify any unique column or column combination as primary key.) | primary key (In MongoDB, the primary key is automatically set to the _id field.) |
| aggregation (e.g. group by) | aggregation pipeline (See the SQL to Aggregation Mapping Chart.) |
BSON Type
| Type | Number | Alias | Notes |
|---|---|---|---|
| Double | 1 | “double” | |
| String | 2 | “string” | |
| Object | 3 | “object” | |
| Array | 4 | “array” | |
| Binary data | 5 | “binData” | |
| Undefined | 6 | “undefined” | Deprecated. |
| ObjectId | 7 | “objectId” | |
| Boolean | 8 | “bool” | |
| Date | 9 | “date” | |
| Null | 10 | “null” | |
| Regular Expression | 11 | “regex” | |
| DBPointer | 12 | “dbPointer” | Deprecated. |
| JavaScript | 13 | “javascript” | |
| Symbol | 14 | “symbol” | Deprecated. |
| JavaScript (with scope) | 15 | “javascriptWithScope” | |
| 32-bit integer | 16 | “int” | |
| Timestamp | 17 | “timestamp” | |
| 64-bit integer | 18 | “long” | |
| Decimal128 | 19 | “decimal” | New in version 3.4. |
| Min key | -1 | “minKey” | |
| Max key | 127 | “maxKey” |
To determine a field’s type, see Check Types in the mongo Shell
If you convert BSON to JSON, see the Extended JSON reference.
การติดตั้งบน Windows
- ตรวจ Windows Version โดยใช้คำสั้งใน CMD/Powershell
wmic os get captionและwmic os get osarchitectureแล้วเลือกตัวติดตั้งให้ถูกต้อง - Download MongoDB for Windows
- ระบุตำแหน่งที่จะติดตั้ง เช่น C:\mongodb
- ตั้งค่า MongoDB enviroment โดยปกติ default data directory จะที่ \data\db ที่ Drive ที่ start MongoDB จากข้อ 3 ทำให้ข้อนี้ต่อสร้าง ไว้ที่ C:\data\db แต่เราสามารถเปลี่ยนตำแหน่งได้ 2 วิธี
- ระบุตอน start server โดยใช้
--dbpath "data path"เช่น$ "C:\mongodb\bin\mongod.exe" --dbpath "C:\mongodb\data\db" - ระบุ dbpath ไว้ที่ configuration file โดยสร้างไฟล์ mongod.cfg ไว้ที่ C:\mongodb\bin (ที่เดียวกับ mongod.exe) แล้วค่าดังนี้ (มีการตั้งค่าสร้าง log ไฟล์ด้วย) start server โดยใช้
$ "C:\mongodb\bin\mongod.exe" --config "C:\mongodb\bin\mongod.cfg"
systemLog:
    destination: file
    path: C:\mongodb\data\log\mongod.log
storage:
    dbPath: C:\mongodb\data\db
- สั่ง start MongoDB ใช้คำสั่ง
$ C:\mongodb\bin\mongod.exeซึ่งโปรแกรมจะใช้ default data directory ที่ C:\data\db - เริ่มใช้งาน MongoDB โดยใช้คำสั่ง
$ mongo - หยุดการใช้งานใช้ Ctrl + C
การติดตั้ง MongoDB service แบบ Automatic
- ใช้ CMD แบบ Administrator
- ใช้ option --install ตามหลัง
$ "C:\mongodb\bin\mongod.exe" --config "C:\mongodb\bin\mongod.cfg" --install - Start MongoDB service ใช้คำสั้ง
$ net start MongoDB - Stop MongoDB service ใช้คำสั้ง
$ net stop MongoDB - ถ้าจะลบออกจาก service ใช้ option --remove ตามหลัง
$ C:\mongodb\bin\mongod.exe --remove
การติดตั้ง MongoDB service แบบ manaul
- ใช้ CMD แบบ Administrator
- ใช้คำสั่งสร้าง service
$ sc.exe create MongoDB binPath= "\"C:\mongodb\bin\mongod.exe\" --service --config=\"C:\mongodb\bin\mongod.cfg\"" DisplayName= "MongoDB" start= "auto" - Start MongoDB service ใช้คำสั้ง
$ net start MongoDB - Stop MongoDB service ใช้คำสั้ง
$ net stop MongoDB - ถ้าจะลบออกจาก service ใช้คำสั้ง
$ sc.exe delete MongoDB
วิธีการสร้าง Databases & Collections
จะใช้ mongo shell use <db> เพื่อระบุฐานข้อมูลที่ต้องการใช้ก่อน
use myNewDB

db.myNewCollection1.insert( { x: 1 } )
ซึ่งถ้ายังไม่มี database ที่เลือก โปรแกรมจะสร้าง database myNewDB และ collection myNewCollection1 ให้ เมื่อมีการเรียก insert()
ส่วนการ collection ถ้ายังไม่มีจะถูกสร้างให้ใหม่ เมื่อใช้ insert() และ createIndex()
db.myNewCollection2.insert( { x: 1 } )

db.myNewCollection3.createIndex( { y: 1 } )
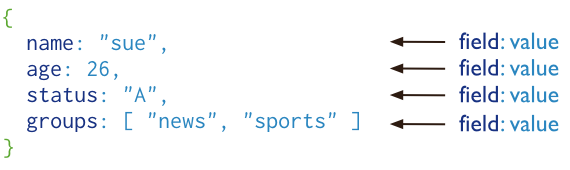
Document Structure
MongoDB documents จะจัดเก็บในรูปแบบ field-and-value pairs
{
  field1: value1,
  field2: value2,
  field3: value3,
  ...
  fieldN: valueN
}
ซึ่ง Field names จะต้องเป็น string และมีกฎดังนี้
_idจะเป็นคำสงวนไว้สำหรับ primary key เท่านั้น (MongoDB driver automatically generates an ObjectId)- ห้ามขึ้นต้นด้วย dollar sign (
$) character - ห้ามประกอบด้วย dot (
.) character - ห้ามประกอบด้วย
nullcharacter
ส่วน value จะเป็นอะไรก็ได้ที่เป็น BSON data types เช่น เป็น other documents, arrays, and arrays of documents
{
  var mydoc = {
    _id: ObjectId("5099803df3f4948bd2f98391"),
    name: { first: "Alan", last: "Turing" },
    birth: new Date('Jun 23, 1912'),
    death: new Date('Jun 07, 1954'),
    contribs: [ "Turing machine", "Turing test", "Turingery" ],
    views : NumberLong(1250000)
  }
}
จากตัวอย่างข้างบน
_idholds an ObjectId.nameholds an embedded document that contains the fields first and last.birthand death hold values of the Date type.contribsholds an array of strings.viewsholds a value of the NumberLong type
จะใช้ dot (.) ในการเข้าถึงข้อมูลใน Arrays <array>.<index> และ Embedded Documents <embedded document>.<field> ตัวอย่าง
{
  ...
  contribs: [ "Turing machine", "Turing test", "Turingery" ],
  ...
}
ถ้าจะเข้าถึง element ที่ 3 ของ contribs array ใช้ contribs.2" (เริ่มต้น index ที่ 0)
{
  ...
  name: { first: "Alan", last: "Turing" },
  contact: { phone: { type: "cell", number: "111-222-3333" } },
  ...
}
ถ้าจะเข้า field ชื่อ last ของ field name ใช้ name.last
หมายเหตุ The maximum BSON document size is 16 megabytes.
mongo Shell
- ใช้คำสั่ง
$ mongo.exeเพื่อ start mongo shell - ดูว่าขณะนี้กำลังใช้งาน database ชื่ออะไรใช้
$ db - ต้องการแสดง databases ทั้งหมด
$ show dbs - เปลี่ยน database ที่จะใช้
$ use <database name> - ต้องการดู collections ทั้งหมด `$ show collections
MongoDB CRUD operations
Insert Documents
Insert Documents เป็นการเพิ่ม document เข้าไปใน collection ซึ่งถ้ายังไม่มี collection จะถูกสร้างให้อัตโนมัติ
db.collection.insertOne()inserts a single document into a collection, will return a document providing the inserted document’s _id field ตัวอย่างdb.products.insertOne( { item: "card", qty: 15 } );return{ "acknowledged" : true, "insertedId" : ObjectId("56fc40f9d735c28df206d078")}db.collection.insertMany()inserts multiple documents into a collection, will return a document providing each inserted document’s _id field ตัวอย่างdb.products.insertOne( { item: "card", qty: 15 }, { item: "envelope", qty: 20 }, { item: "stamps", qty: 30 } );return{ "acknowledged" : true, "insertedId" : [ObjectId("562a94d381cb9f1cd6eb0e1a"), ObjectId("562a94d381cb9f1cd6eb0e1b"), ObjectId("562a94d381cb9f1cd6eb0e1c")]}db.collection.insert()inserts a single document or multiple documents into a collection, returns the following WriteResult object ตัวอย่างdb.products.insert( { item: "card", qty: 15 } );returnWriteResult({ "nInserted" : 1 })ถ้า insert แบบ multiple documents จะได้ BulkWriteResult object แทน
Query Documents
Query Documents ใช้ db.collection.find( <query filter>, <projection> ) โดย query filter คือ where และ projection คือ select อะไรออกมาบ้าง และสามารถใช้ db.collection.findOne() จะได้ผลลัพธ์ออกมา 1 document ซึ่งจริงๆ แล้ว db.collection.findOne() มันคือ db.collection.find() ที่ limit 1 ไว้
query filter
- ค้นหาทั้งหมด
db.users.find( {} )หรือdb.users.find() - ค้นหาแบบระบุเงื่อนไข
{ <field1>: <value1>, ... }แทนที่ query filter เช่นdb.users.find( { status: "A" } )หรือdb.users.find( { status: { $in: [ "P", "D" ] } } ) - การใช้ AND
db.users.find( { status: "A", age: { $lt: 30 } } ) - การใช้ OR
db.users.find({$or: [ { status: "A" }, { age: { $lt: 30 } } ]}) - การใช้ AND กับ OR
db.users.find({status: "A", $or: [ { age: { $lt: 30 } }, { type: 1 } ]}) - คิวรี่ Embedded Document
- Exact Match on the Embedded Document
db.users.find( { favorites: { artist: "Picasso", food: "pizza" } } ) - Equality Match on Fields within an Embedded Document
db.users.find( { "favorites.artist": "Picasso" } )
- Exact Match on the Embedded Document
- คิวรี่ Array
- Exact Match on an Array
db.users.find( { badges: [ "blue", "black" ] } ) - Match an Array Element
db.users.find( { badges: "black" } ) - Match a Specific Element of an Array
db.users.find( { "badges.0": "black" } ) - Specify Multiple Criteria for Array Elements
- Single Element Satisfies the Criteria ใช้
$elemMatchตัวอย่างdb.users.find( { finished: { $elemMatch: { $gt: 15, $lt: 20 } } } ) - Combination of Elements Satisfies the Criteria
db.users.find( { finished: { $gt: 15, $lt: 20 } } )
- Single Element Satisfies the Criteria ใช้
- Exact Match on an Array
- คิวรี่ Array of Embedded Documents
- Match a Field in the Embedded Document Using the Array Index
db.users.find( { 'points.0.points': { $lte: 55 } } ) - Match a Field Without Specifying Array Index
db.users.find( { 'points.points': { $lte: 55 } } ) - Specify Multiple Criteria for Array of Documents
- Single Element Satisfies the Criteria ใช้
$elemMatchตัวอย่างdb.users.find( { points: { $elemMatch: { points: { $lte: 70 }, bonus: 20 } } } ) - Combination of Elements Satisfies the Criteria
db.users.find( { "points.points": { $lte: 70 }, "points.bonus": 20 } )
- Single Element Satisfies the Criteria ใช้
- Match a Field in the Embedded Document Using the Array Index
- การคิวรี่
nullเช่นdb.users.find( { name: null } )จะได้ field name ที่มีค่าเป็น null และ document ที่ไม่มี field ชื่อ name - ดังนั้นการคิวรี่ document ที่มี หรือไม่มี field ชื่ออะไรนั้น จะใช้
$existsเช่นdb.users.find( { name : { $exists: false } } )แบบนี้จะได้ documents ที่ไม่มี field ชื่อ name ออกมา
Projection Document
เป็นการระบุว่าจะให้ return fields ไหนออกมาบ้าง โดยมีวิธีการระบุคือ { field1: <value>, field2: <value> ... } ซึ่ง value จะเป็น 1/true ถ้าต้องการ และ 0/false ถ้าไม่ต้องการ เช่น
db.users.find( { status: "A" }, { name: 1, status: 1 } )จะได้ _id, name, statusdb.users.find( { status: "A" }, { name: 1, status: 1, _id: 0 } )จะได้ name, statusdb.users.find( { status: "A" }, { favorites: 0, points: 0 } )จะได้ทุก field ยกเว้น favorites, points- การระบุถึง field ใน embedded documents
db.users.find({ status: "A" }, { name: 1, status: 1, "favorites.food": 1 })ดังนั้นใน favorites จะแสดงแค่ food ออกมาเท่านั้น ซึ่งถ้าเป็น 0 จะแสดง fields อื่นออกมาแทน - การระบุถึง field ใน embedded documents ที่อยู่ใน Array
db.users.find( { status: "A" }, { name: 1, status: 1, "points.bonus": 1 } )ดังนั้น object ที่อยู่ Array points จะแสดงแค่ field bonus เท่านั้น - การจะใช้แสดงข้อมูลใน element ไหนใน Array ใช้
$sliceprojection operatordb.users.find( { status: "A" }, { name: 1, status: 1, points: { $slice: -1 } } )คือให้เอา element สุดท้ายออกมา จำไว้ว่าไม่สามารถระบุเป็น index แบบนี้ ได้{ "ratings.0": 1 }
Update Documents
การอัพเดท documents ทำได้ 4 วิธี
db.collection.updateOne(<filter>, <update>, {upsert: <boolean>, writeConcern: <document>, collation: <document>})Updates at first document that match a specified filter. กรณี upsert: true คือถ้าไม่มีตามเงื่อนไขให้ insert ใหม่db.collection.updateMany(<filter>, <update>, {upsert: <boolean>, writeConcern: <document>, collation: <document>})Update all documents that match a specified filter.db.collection.replaceOne(<filter>, <replacement>, {upsert: <boolean>, writeConcern: <document>, collation: <document>})Replaces at first document that match a specified filter.db.collection.update(<filter>, <update>, {upsert: <boolean>, multi: <boolean>, writeConcern: <document>})Either updates or replaces a single document that match a specified filter or updates all documents that match a specified filter. โดยปกติ update() จะเป็นการอัพเดทรายการเดียว ถ้าต้องการหลายรายการใช้ multi option{ multi: true }
การใช้งาน
db.users.updateOne(
  { 'favorites.artist': 'Picasso' },
  {
    $set: { 'favorites.food': 'pie', type: 3 },
    $currentDate: { lastModified: true },
  }
)
หมายถึงให้อัพเดทที่ document แรกที่เจอจากเงื่อนไข favorites.artist = "Picasso" และใช้ $set operator ในการอัพเดทค่า ส่วน $currentDate operator สั่งให้อัพเดท lastModified field เป็น current date ซึ่งถ้าไม่มี field นี้ จะสร้างให้
db.users.updateMany(
  { 'favorites.artist': 'Picasso' },
  {
    $set: { 'favorites.artist': 'Pisanello', type: 3 },
    $currentDate: { lastModified: true },
  }
)
หมายถึงให้อัพเดททุก document ที่เจอจากเงื่อนไข favorites.artist = "Picasso" และใช้ $set operator ในการอัพเดทค่า ส่วน $currentDate operator สั่งให้อัพเดท lastModified field เป็น current date ซึ่งถ้าไม่มี field นี้ จะสร้างให้
db.users.replaceOne(
  { name: 'abc' },
  { name: 'amy', age: 34, type: 2, status: 'P', favorites: { artist: 'Dali', food: 'donuts' } }
)
หมายถึงให้ replace document แรกที่เจอจากเงื่อนไข name = "abc" ด้วย new document ทุก field ยกเว้น _id จริงๆ แล้วสามารถใช้ db.collection.update({}, {}) ได้เช่นกัน
db.users.update(
  { name: 'abc' },
  { name: 'amy', age: 34, type: 2, status: 'P', favorites: { artist: 'Dali', food: 'donuts' } }
)
db.users.update(
  { 'favorites.artist': 'Picasso' },
  {
    $set: { 'favorites.artist': 'Pisanello', type: 3 },
    $currentDate: { lastModified: true },
  }
)
หมายถึงให้อัพเดท document แรกที่เจอจากเงื่อนไข favorites.artist = "Picasso" และใช้ $set operator ในการอัพเดทค่า ส่วน $currentDate operator สั่งให้อัพเดท lastModified field เป็น current date ซึ่งถ้าไม่มี field นี้ จะสร้างให้ แต่ถ้าต้องการให้ update ทุก document ให้ใส่ { multi: true }
db.users.update(
  { 'favorites.artist': 'Picasso' },
  {
    $set: { 'favorites.artist': 'Pisanello', type: 3 },
    $currentDate: { lastModified: true },
  },
  { multi: true }
)
Delete Documents
การลบ documents ทำได้ 3 วิธี
db.collection.remove()Delete a single document or all documents that match a specified filter.db.collection.deleteOne()Delete at first document that match a specified filter. หรือจะใช้remove()ที่กำหนดjustOne: truedb.collection.deleteMany()Delete all documents that match a specified filter.
การใช้งาน
- ลบทั้งหมด
db.users.deleteMany({})หรือdb.users.remove({}) - ลบทั้งหมดตามเงื่อนไข
db.users.deleteMany({ status : "A" })หรือdb.users.remove( { status : "A" } ) - ลบ document แรกที่เจอตามเงื่อนไข
db.users.deleteOne( { status: "D" } )หรือdb.users.remove( { status: "D" }, 1)
Bulk Write Operations
เอาไว้จัดการการ insert, update, remove ข้อมูลขนาดใหญ่ๆ (insert ขนาดใหญ่ ใช้ db.collection.insertMany()) โดยปกติจะทำงานตามลำดับ ถ้าไม่ต้องการให้ทำงานตามลำดับใช้ option ordered: false ซึ่ง bulkWrite() method จะรองรับคำสั่งดังนี้
- insertOne
- updateOne
- updateMany
- replaceOne
- deleteOne
- deleteMany
ตัวอย่างการใช้งาน
try {
  db.characters.bulkWrite([
    {
      insertOne: {
        document: {
          _id: 4,
          char: 'Dithras',
          class: 'barbarian',
          lvl: 4,
        },
      },
    },
    {
      insertOne: {
        document: {
          _id: 5,
          char: 'Taeln',
          class: 'fighter',
          lvl: 3,
        },
      },
    },
    {
      updateOne: {
        filter: { char: 'Eldon' },
        update: { $set: { status: 'Critical Injury' } },
      },
    },
    { deleteOne: { filter: { char: 'Brisbane' } } },
    {
      replaceOne: {
        filter: { char: 'Meldane' },
        replacement: { char: 'Tanys', class: 'oracle', lvl: 4 },
      },
    },
  ])
} catch (e) {
  print(e)
}
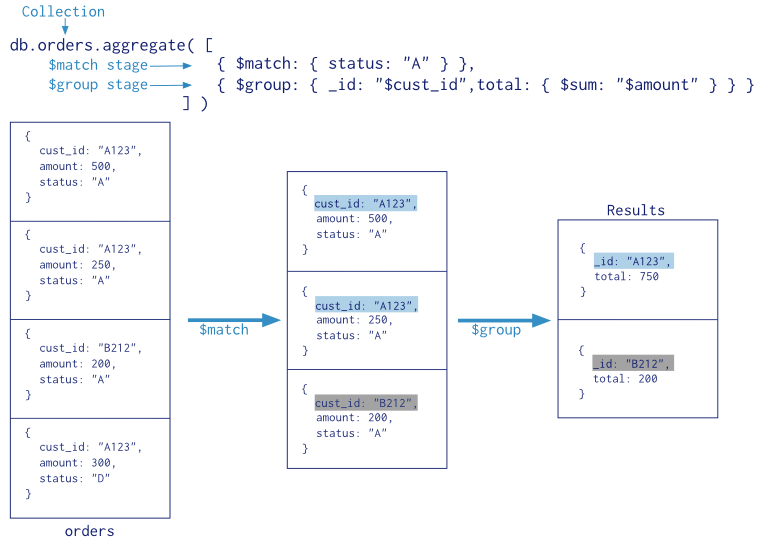
Aggregation Pipeline
ใช้ db.collection.aggregate() ตัวอย่าง