- Published on
วิธีทำให้ Replicate บน PostgreSQL สามารถเขียนข้อมูลได้
- Authors

- Name
- Somprasong Damyos
- @somprasongd
วิธีทำให้ Replicate บน PostgreSQL สามารถเขียนข้อมูลได้
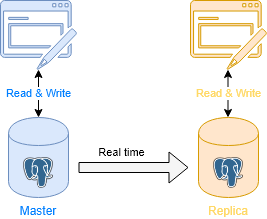
เนื่องจากมีโจทย์ว่าต้องการที่จะ sync ฐานข้อมูลบางตารางจากฐานข้อมูลจริง มายังฐานข้อมูลอีกตัว แต่ละต้องการที่เพิ่ม แก้ไข และลบได้ด้วย โดยไม่ผลกับฐานข้อมูลจริง ซึ่งโชคดีมากที่ PostgreSQL ตั้งแต่เวอร์ชัน 10 ขึ้นไป มีความสามารถหนึ่งที่เรียกว่า Logical Replication มาช่วยทำงานนี้ได้

Logical Replication คือ
Logical Replication มันก็คือการทำ replication data รูปแบบหนึ่ง ที่ต้องใช้ตัวอ้างอิงอย่างหนึ่งที่เรียกว่า replication identity โดยปกติมันจะใช้ primary key ซึ่งถ้าไม่มีก็จะใช้ unique key ตัวอื่น หรือถ้าไม่มีเลยก็ใช้ข้อมูลทั้งแถวนั้นๆ เป็นตัวอ้างอิง
โดยการทำงานจะทำผ่านวิธีการ publish และ subscribe โดยเริ่มต้นฝั่ง publisher จะทำการ snapshot ข้อมูล และทำการ copy ไปยังฝั่ง subscriber เมื่อเสร็จแล้ว และฝั่ง publisher เกิดการเปลี่ยนแปลงของข้อมูล (insert, update, delete) ฝั่ง subscriber ก็จะได้รับข้อมูลนั้นๆ ด้วย แบบ real-time โดยอาศัย replication identity เป็นตัวอ้างอิง
ซึ่งฝั่ง subscriber เองนั้นก็สามารถเพิ่ม หรือแก้ไขข้อมูลได้ด้วย โดยการเพิ่มข้อมูลใหม่นั้น มีข้อจำกัดอยู่อย่างหนึ่ง คือ ถ้าให้ replication identity นั้นซ้ำกันเด็ดขาด เพราะจะทำให้เกิด conflict และไม่สามารถทำการ sync ข้อมูลกันได้ ส่วนการอัพเดทข้อมูลในฝั่ง subscriber ถ้าฝั่ง publisher แก้ไขข้อมูลนั้นภายหลัง ข้อมูลนั้นจะถูกเขียนทับเป็นข้อมูลของฝั่ง publisher แทน
วิธีการติดตั้ง Logical Replication
ในการติดตั้งจะต้องใช้ server 2 ตัว ที่ติดตั้ง PostgreSQL เวอร์ชัน 10 ขึ้นไป ซึ่งผมจะเรียกชื่อว่า db-master และ db-replica แทน โดยในตัวอย่างนี้จะทำการติดตั้งผ่าน docker
version: '3.1'

services:
  db-master:
    image: postgres:10-alpine
    restart: always
    ports:
      - 5433:5432
    environment:
      POSTGRES_USER: postgres
      POSTGRES_PASSWORD: postgres
      POSTGRES_DB: example
    volumes:
      - pg-data-master:/var/lib/postgresql/data
    command: ['postgres', '-c', 'wal_level=logical']

  db-replica:
    image: postgres:10-alpine
    restart: always
    ports:
      - 5434:5432
    environment:
      POSTGRES_USER: postgres
      POSTGRES_PASSWORD: postgres
      POSTGRES_DB: example
    volumes:
      - pg-data-rep:/var/lib/postgresql/data

volumes:
  pg-data-master:
  pg-data-rep:
ขั้นตอนที่ 1 - เปิดใช้งาน Logical Replication
ในขั้นตอนนี้ถ้าใช้งานผ่าน docker สามารถข้ามไปได้เลย แต่ถ้าไม่ใช่จะตั้งค่าที่ db-master โดยเริ่มจากการแก้ไขไฟล์ postgresql.conf ให้เปิดรับการเชื่อมต่อจาก db-replica ผ่านทาง ip ของตัว db-master เอง
# หาตำแหน่งไฟล์ postgresql.conf
# ใน docker ของผม จะอยู่ที่ /var/lib/postgresql/data/
$ psql -U postgres -c 'SHOW config_file'

# เปิดไฟล์มาแก้ไข
$ sudo nano /var/lib/postgresql/data/postgresql.conf

# แก้ที่ #listen_addresses = 'localhost' เป็น
...
listen_addresses = 'localhost, db_master_ip_address'
...
ใน docker จะตั้งค่าเป็น listen_addresses = '*'
ถัดมาต้องเปิดใช้งาน Write Ahead Log (WAL) เป็น logical
...
wal_level = logical
...
ใน docker สามารถตั้งค่าผ่าน command ได้ ที่ docker-compose.yml บรรทัดที่ 15
ถัดมาเพิ่มให้ db-replica สามารถเชื่อมต่อมาได้ โดยให้แก้ไฟล์ pg_hba.conf ซึ่งจะอยู่ที่ตำแหน่งเดียวกันกับ postgresql.conf
...
# TYPE      DATABASE        USER         ADDRESS                       METHOD
...
host         all            all          db_replica_ip_address/32      md5
ใน docker จะตั้งค่ามาเป็น host all all all md5
สุดท้ายให้ ทำการ restart PostgreSQL server
$ sudo systemctl restart postgresql
ขั้นตอนที่ 2 - สร้างฐานข้อมูล และตั้งค่า user role
เริ่มจากสร้างฐานข้อมูล (ถ้ารันผ่าน docker-compose.yml ข้ามได้ เพราะสร้างมาให้แล้ว)
db-master
$ createdb -U postgres example
db-replica
$ createdb -U postgres example
สร้างตารางชื่อ vitalsigns ทั้ง 2 ที่
db-master
$ psql -U postgres example

example=# CREATE TABLE vitalsigns (id text, weight text, height text, temp text, CONSTRAINT vitalsigns_pkey PRIMARY KEY (id));
db-replica
$ psql -U postgres example

example=# CREATE TABLE vitalsigns (id text, weight text, height text, temp text, CONSTRAINT vitalsigns_pkey PRIMARY KEY (id));
ในฝั่งของ db-replica ไม่จำเป็นที่จะต้องมี column เท่า db-master โดย column ที่เพิ่มมาจะต้องไม่ตั้งค่าเป็น NOT NULL หรือ มี constraints อื่นๆ เพราะจะให้ไม่สามารถ sync มาได้
ถัดมาจะเป็นการเพิ่ม user role สำหรับการทำ Replication โดยต้องทำที่ db-master
# on db-master
example=# CREATE ROLE rep_user WITH REPLICATION LOGIN PASSWORD 'rep_password';

# grant full privileges on the example database to the user role you just created
example=# GRANT ALL PRIVILEGES ON DATABASE example TO rep_user;

# grant privileges on all of the tables contained in the database to your user
example=# GRANT ALL PRIVILEGES ON ALL TABLES IN SCHEMA public TO rep_user;
ขั้นตอนที่ 3 - การตั้งค่าฝั่ง Publisher
จะเป็นการตั้งค่าที่ db-master ให้เป็น publisher โดยสามารถกำหนดได้ว่าจะทำการ replication ตารางไหนบาง หรือจะเอาทั้งหมดก็ได้ (เพิ่มเติม)
# on db-master

# create a publication called my_pub:
example=# CREATE PUBLICATION my_pub;

# Add the vitalsigns table you created previously to it:
example=# ALTER PUBLICATION my_pub ADD TABLE vitalsigns;
ขั้นตอนที่ 4 - การตั้งค่าฝั่ง Subscriber
จะเป็นการตั้งค่าที่ db-replica ให้เป็น subscriber (เพิ่มเติม)
# on db-replica

# create a subscription called my_sub:
example=# CREATE SUBSCRIPTION my_sub CONNECTION 'host=db-master port=5432 user=rep_user password=rep_password dbname=example' PUBLICATION my_pub;

# You will see the following output confirming the subscription:
# NOTICE:  created replication slot "my_sub" on publisher
# CREATE SUBSCRIPTION
ขั้นตอนที่ 5 - ทดสอบ
ทดลองเพิ่มข้อมูลที่ db-master
# on db-master

example=# INSERT INTO vitalsigns (id, weight, height, temp) VALUES ('1', '60', '160', '36'), ('2', '70', '170', '37'), ('3', '80', '180', '38');
ลองคิวรี่ข้อมูลที่ db-replica
# on db-replica

example=# SELECT * FROM vitalsigns;

# output
 id | weight | height | temp
----+--------+--------+------
  1 | 60     |  160   | 36
  2 | 70     |  170   | 37
  3 | 80     |  180   | 38
(3 rows)
ลองเพิ่มข้อมูลที่ db-replica
# on db-replica

example=# INSERT INTO vitalsigns (id, weight, height, temp) VALUES ('4', '90', '190', '37.5');

example=# SELECT * FROM vitalsigns;

# output
 id | weight | height | temp
----+--------+--------+------
  1 | 60     |  160   | 36
  2 | 70     |  170   | 37
  3 | 80     |  180   | 38
  4 | 90     |  190   | 37.5
(4 rows)
ลองคิวรี่ข้อมูลที่ db-master จะไม่ข้อมูล id = '4'
# on db-master

example=# SELECT * FROM vitalsigns;

# output
 id | weight | height | temp
----+--------+--------+------
  1 | 60     |  160   | 36
  2 | 70     |  170   | 37
  3 | 80     |  180   | 38
(3 rows)
ซึ่ง ถ้ามีการเพิ่มข้อมูลฝั่ง db-master ต้องห้ามใช้ id = '4' โดยเด็ดขาด
ทดลอง update และ delete ฝั่ง db-master
# on db-master

example=# UPDATE vitalsigns SET temp = '37.7' WHERE id = '3';

example=# DELETE FROM vitalsigns WHERE id = '1';
เมื่อมาดูฝั่ง db-replica จะพบว่า id = '3' มีการเปลี่ยนแปลงด้วย และจะไม่พบข้อมูล id = '1' แล้ว
# on db-replica

example=# SELECT * FROM vitalsigns;

# output
 id | weight | height | temp
----+--------+--------+------
  2 | 70     |  170   | 37
  3 | 80     |  180   | 37.7
  4 | 90     |  190   | 37.5
(3 rows)
สรุป
ในบทความนี้ได้แสดงวิธีการทำ Logical Replication ระหว่าง database server 2 ตัว ซึ่งจริงๆ แล้วเราสามารถมีหลาย subscribers ก็ได้ โดยวิธีการนี้สามารถทำ replication ได้แบบ real-time แถมยังเขียนข้อมูลเพิ่มในฝั่ง replication server ไดด้ด้วย แต่ก็มีข้อจำกัดอยู่ที่ replication identity ต้องระวังอย่าให้เกิด conflict ขึ้น เพราะจะทำให้ระบบไม่สามารถทำงานต่อได้