- Published on
เริ่มต้นใช้งาน Git
- Authors

- Name
- Somprasong Damyos
- @somprasongd
เริ่มต้นใช้งาน Git
Original Post: https://medium.com/open-source-technology/git-เริ่มต้นใช้งาน-git-e8f873a4fdc

Git คือ เครื่องมือที่เอาไว้บันทึกเวอร์ชันการเปลี่ยนแปลงของไฟล์ในโปรเจคเรา ทำให้เราสามารถที่จะย้อนกลับไปดูเวอร์ชันต่างๆ ของโปรเจคได้ทุกเมื่อ หรือจะดูว่าใครเป็นคนแก้ไขไฟล์นั้นๆ ก็ได้
Git นั้นจัดว่าเป็น Version Control แบบ Decentralized/Distributed คือไม่ต้องมีเซิร์ฟเวอร์เก็บโค้ดไว้ตรงกลาง ซึ่งจะต่างกับพวก Subversion หรือ CVS ที่ต้องมีเซิร์ฟเวอร์เก็บโค้ดรวมไว้ตรงกลาง (Centralized) และที่สำคัญ Git นั้นทำงานได้เร็วมากกว่าด้วย
ในบทความนี้จะพูดถึงบ้าง
- Git basic workflow และ core features
- วิธีการกู้คืนไฟล์ และการบันทึกหลายๆ เวอร์ชันในโปรเจค
- การใช้ Git ทำงานร่วมกับคนอื่น (Collaborate) ผ่าน Remote Repository (GitHub)
เตรียมความพร้อมก่อนใช้งาน
การติดตั้ง Git
- Windows ดาวน์โหลดตัวติดตั้งได้จาก https://git-scm.com/downloads
- Mac OS X Yosemite or later ติดตั้งผ่าน Terminal ให้พิมพ์
$ git version - Linux ติดตั่งผ่าน Terminal ให้พิมพ์
$ sudo apt-get install git
Git Configurations
ก่อนจะเริ่มใช้งาน Git ได้นั้น จำเป็นต้องตั้งค่าการใช้งานเบื้องต้นก่อน ในบทความนี้จะใช้โปรแกรม Git Bash ที่ติดตั้งมาพร้อม Git for Windows
- ตั้งชื่อผู้ใช้งาน “user.name”
$ git config --global user.name "Somprasong Damyos" - ตั้งอีเมลของผู้ใช้งาน “user.email”
$ git config --global user.email "somprasong@git.com" - ตรวจสอบว่าที่ตั้งค่าถูกต้องหรือไม่
$ git config --global --list
user.name=Somprasong Damyos
user.email=somprasong@git.comหรือ$ cat ~/.gitconfig
[user]
      name = Somprasong Damyos
      email = somprasong@git.com
กำหนด Default Text Editor ให้กับ Git
จะใช้ Text Editor ตัวไหนก็ได้แล้วแต่ความถนัด แต่ในบทความจะเลือกใช้ Notepad++
💡 Editor อื่น ดูได้จาก https://git-scm.com/book/en/v2/Appendix-C%3A-Git-Commands-Setup-and-Config
- กำหนด Path ที่ติดตั้ง Notepad++ ใน System Environment
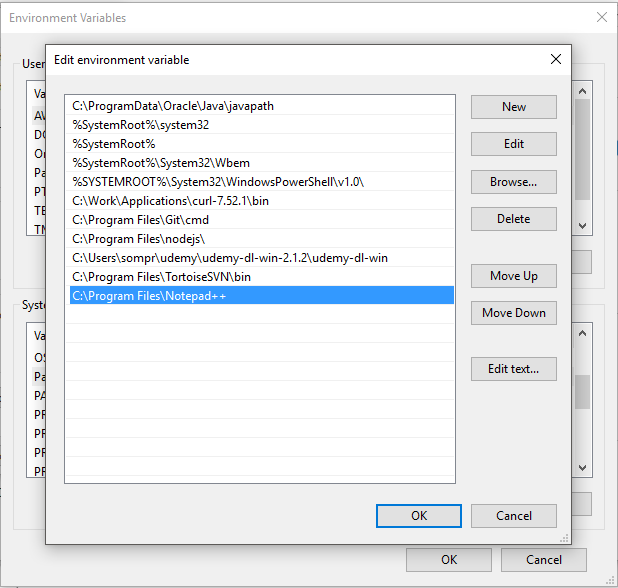
- กำหนดให้ Notepad++ เป็น Default Text Editor
$ git config --global core.editor "notepad++.exe -multiInst -nosession" - ทดสอบ
$ git config --global -e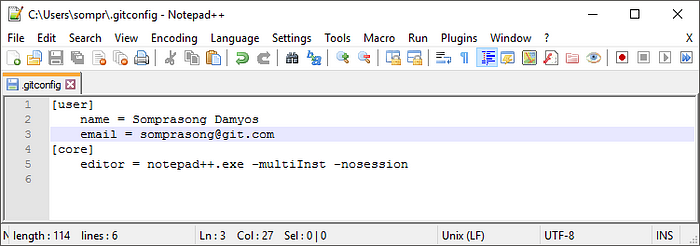
สมัครใช้งาน GitHub
- ไปที่ https://github.com/ และทำการ Sign up ให้เรียบร้อย
เชื่อมต่อ Github ด้วย SSH
- ตรวจสอบว่ามี SSH keys แล้วหรือไม่ ผ่านโปรแกรม Git Bash
$ ls -al ~/.ssh
# Lists the files in your .ssh directory, if they exist
- ถ้ายังไม่มี ให้สร้างใหม่โดยใช้ GitHub email โปรแกรมจะถามชื่อไฟล์ และรหัสผ่าน ถ้าไม่ต้องการเปลี่ยนแปลงก็กด Enter ไปได้เลย
$ ssh-keygen -t rsa -b 4096 -C "your_email@example.com"
Generating public/private rsa key pair.
Enter a file in which to save the key (/Users/you/.ssh/id_rsa):[Press enter]
Enter passphrase (empty for no passphrase):[Type a passphrase]
Enter same passphrase again:[Type passphrase again]
- เพิ่ม SSH keys ที่สร้างมาเข้าใน ssh-agent
# start the ssh-agent in the background
$ eval $(ssh-agent -s)
Agent pid 59566$ ssh-add ~/.ssh/id_rsa
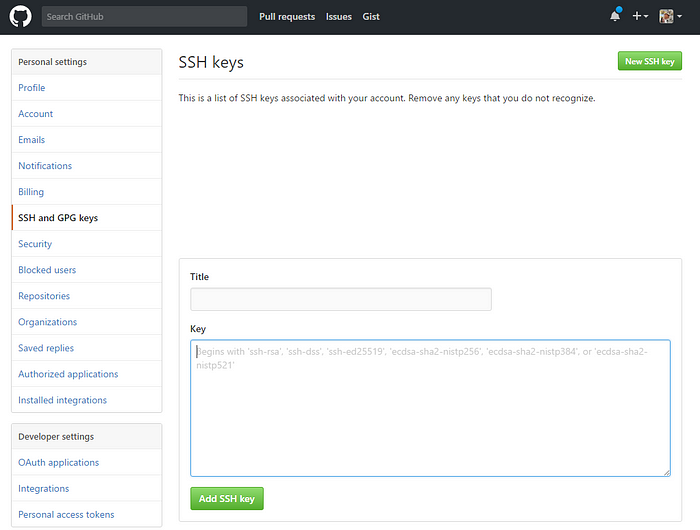
- เพิ่ม SSH keys ในบัญชี GitHub ของเรา โดยให้คัดลอก SSH key ก่อน
$ clip < ~/.ssh/id_rsa.pub
# Copies the contents of the id_rsa.pub file to your clipboard
- ล็อกอินเข้า https://github.com เลือกที่รูปโปรไฟล์ > เลือก Setting > เลือกเมนู SSH and GPG keys > คลิก New SSH Key > ให้ตั้งชื่อเครื่องของเราที่ “Title” และวาง SSH key ลงไปที่ “Key” > สุดท้ายกด Add SSH Key
เริ่มได้สักที
1. Basic Git Workflow
ใน Git project จะประกอบด้วย 3 ส่วน
- Working Directory: เป็นที่เก็บไฟล์ที่เราทำงานทุกอย่าง ทั้งสร้างใหม่ แก้ไข และลบทิ้ง
- Staging Area: คือ ที่รวบรวมรายการที่แก้ไขไปทั้งหมดจาก working directory ที่จะนำเข้า repository
- Repository: เป็นที่จัดเก็บไฟล์ที่มีการเปลี่ยนแปลงอย่างถาวร แยกเป็นเวอร์ชัน

ดังนั้น Git workflow จะประกอบด้วยการแก้ไขไฟล์ใน working directory แล้วนำไฟล์เหล่านั้นเข้า staging area สุดท้ายบันทึกการแก้ไขเข้า Git repository ด้วยคำสั่ง commit ซึ่งมีวิธีการใช้งาน ดังนี้
เริ่มจากสร้าง Working directory ชื่อ
git-demoและสร้างไฟล์greeting.txtไว้ข้างใน$ mkdir git-demo $ cd git-demo $ echo "me: Hello Git" > greeting.txtสร้าง Git repository (
.git/)ด้วยคำสั่งinit$ git init Initialized empty Git repository in C:/Users/usrname/git-demo/.git/ตรวจสอบสถานะไฟล์ในโปรเจค
git-demo****จะพบข้อความเตือนสีแดงใต้untracked filesซึ่งหมายความว่า Git มองเห็นว่ามีไฟล์อยู่ แต่ไฟล์นี้ยังไม่ได้เริ่ม tracking การเปลี่ยนแปลงของไฟล์นี้เลย$ git status On branch masterInitial commitUntracked files: (use "git add <file>..." to include in what will be committed)greeting.txtnothing added to commit but untracked files present (use "git add" to track)💡 Git Life Cycle
staged → คือสถานะที่ไฟล์พร้อมจะ
commitunstaged → คือไฟล์ที่ถูกแก้ไขแต่ว่ายังไม่ได้เตรียม
commituntracked → คือไฟล์ที่ยังไม่ถูก track โดย Git (ส่วนมากจะเป็นไฟล์ที่เพิ่งสร้างใหม่)
deleted → ไฟล์ที่ถูกลบไปแล้ว
วิธีการเริ่มต้น tracking ไฟล์
greeting.txtนั้น คือต้องเพิ่มไฟล์นี้ลงไฟใน staging area ก่อน โดยใช้คำสั่งgit add filename1 filename2 filename3แต่ถ้าต้องการเพิ่มทุกไฟล์ที่มีการแก้ไข/เปลี่ยนแปลงที่อยู่ใน working directory ใช้git add .$ git add greeting.txtเมื่อลองตรวจสอบสถานะใหม่อีกครั้ง greeting.txt จะเปลี่ยนเป็นสีเขียวแล้ว พร้อมที่จะ commit
$ git status
On branch masterInitial commitChanges to be committed:
  (use "git rm --cached <file>..." to unstage)new file:   greeting.txt
💡 เราสามารถบอก Git ได้ว่าไม่ต้องการให้ Git เก็บไฟล์ไหนบ้าง โดยการสร้างไฟล์ชื่อ
.gitignoreไว้ที่ไดเรกทอรี Git project ภายในก็กำหนดค่าเป็นชื่อไฟล์ หรือชื่อไดเรกทอรีก็ได้ หรือจะกำหนดเป็น*.logคือไม่ต้องเก็บไฟล์.logทั้งหมดคราวนี้ให้แก้ไขไฟล์
greeting.txtโดยเพิ่มข้อความบรรทัดใหม่ว่า“git: Hey, Good to see you.”และเมื่อบันทึกเสร็จให้ลองใช้คำสั่งgit diff filenameเพื่อดูความแตกต่างของไฟล์ระหว่าง Working directory กับ Staging area เสร็จแล้วให้เอาไฟล์นี้เข้า Staging area ด้วย$ echo "git: Hey, Good to see you." >> greeting.txt $ git diff greeting.txt diff --git a/greeting.txt b/greeting.txt index 9f4d96d..44809c3 100644 --- a/greeting.txt +++ b/greeting.txt @@ -1 +1,2 @@ me: Hello Git +git: Hey, Good to see you. $ git add greeting.txt💡 คำอธิบาย
“me: Hello Git”คือ ข้อความเดิมที่อยู่ใน staging area แสดงด้วยตัวอักษรสีขาว- ในส่วนที่มีการแก้ไขเพิ่มเข้ามาจะขึ้นต้นด้วย
+ตัวอักษรสีเขียว - การออกจาก diff mode ให้กด
q
ขั้นตอนสุดท้ายของ Git workflow คือการ
commitไฟล์ที่อยู่ใน staging area เข้าไปเก็บใน Git repository แบบถาวร ด้วยคำสั่งgit commit -m "commit message"โดย commit message นั้นจะต้องอยู่ใน quotation marks, ข้อความต้องเป็น present tense และควรจะไม่เกิน 50 ตัวอักษร$ git commit -m "My first commit" [master (root-commit) 6dd2383] My first commit 1 file changed, 2 insertions(+) create mode 100644 greeting.txtถ้าจะดูประวัติการ
commitใน repository ทำได้โดยใช้คำสั่งgit log$ git log commit 6dd2383d577d33575b32b478d77f4cf3f53097ee Author: Somprasong Damyos <somprasong@git.com> Date: Thu Feb 16 12:09:05 2017 +0700 My first commit💡 Output ที่ได้ มีดังนี้
- เลขการ
commitออกมา 40 ตัวอักษร เรียกว่า SHA ตัวอักษรสีเหลือง แต่เวลาอ้างอิงใช้แค่ 7 ตัวอักษรแรก - ชื่อคน
commit - วันที่ และเวลาที่
commit - commit message
- เลขการ
เนื่องจากรูปแบบการแสดงผลปกติของ
git logนั้นดูยากไปหน่อยถ้ามีประวัติการcommitหลายๆ ครั้ง ส่วนตัวชอบใช้วิธีให้แสดงประวัติแต่ละครั้งในบรรทัดเดียว ตามนี้$ git log --oneline --graph --decorate --all * 6dd2383 (HEAD -> master) My first commitถ้าความขี้เกียจพิมพ์คำสั่งยาวๆ เราสามารถใช้ Git alias สร้างคำสั่งของเราขึ้นมาเองได้ โดยจะเอาการแสดง log ข้างบน มาสร้างเป็นคำสั่ง
git hist$ git config --global alias.hist "log --oneline --graph --decorate --all"ลองทดสอบคำสั่งใหม่ดู
$ git hist
* 6dd2383 (HEAD -> master) My first commit
2. การกู้คืนไฟล์
บางครั้งในการทำงาน เช่น การแก้ซอร์สโค้ด เราอาจจะแก้ซอร์สโค้ดนั้นจนไม่สามารถรันได้อีก และจำไม่ได้ว่าเราแก้ไขอะไรไปแล้วบ้าง ซึ่ง Git นั้นมีฟีเจอร์ง่ายๆ ในการกู้คืนไฟล์ เพื่อแก้ไขความผิดพลาดที่เกิดขึ้นใน Git project ของเรา
สมมุติว่าเผลอลบข้อความในไฟล์
greeting.txtออกทั้งหมด และบันทึกทับไปแล้ว$ echo "" > greeting.txtลองพิมพ์คำสั่ง
git show HEADซึ่งจะแสดงข้อมูลทุกอย่างจากคำสั่งgit logจากHEADcommit และต่อท้ายด้วยสิ่งที่แก้ไขเพิ่มเข้ามาจากการ ‘commit’ ครั้งนั้นถ้าเราต้องการย้อนกลับแก้ไขไฟล์ greeting.txt กลับไปยังการ
HEAD: commit ล่าสุด ให้ใช้คำสั่งgit checkout HEAD filenameก็จะได้ไฟล์กลับมาเหมือนเดิม$ git checkout HEAD greeting.txt $ cat greeting.txt me: Hello Git git: Hey, Good to see you.แต่ถ้าเราเผลอไปใช้
git addจะทำให้ไฟล์ถูกเปลี่ยนสถานะเป็น staged คือพร้อมที่จะ commit แต่เราไม่ต้องการ commit ไฟล์นั้นก่อน ดังนั้นต้องทำให้ไฟล์นั้นกลับมาเป็นสถานะ unstaged เสียก่อน โดยใช้คำสั่งgit reset HEAD filenameแต่ไฟล์ไม่ได้ย้อนกลับการแก้ไขให้เหมือนการcheckoutนะ$ git reset HEAD greeting.txt Unstaged changes after reset: M greeting.txtกรณีที่เราต้องการย้อนกลับไปยัง
commitใดๆ ใช้คำสั่งgit reset SHA(SHA ใช้แค่ 7 ตัวอักษรแรก) ซึ่งเมื่อย้อนกลับไปแล้วHEADจะถูกย้ายกลับไปยังcommitนั้นๆ ด้วย ดูได้จากรูปข้างล่าง และตรงcommitสีเทานั้น ก็จะหายไปจาก Git project ด้วย
3. Branching and Merging
โดยปกติแล้วการจัดการไฟล์ทั้งหมดจะถูกทำอยู่บน Git branch ที่ชื่อว่า master แต่ถ้าเราต้องการจะแยกไฟล์ทั้งหมดออกไปเป็นอีกเวอร์ชันนึง ก็สามารถทำได้โดยการสร้าง branch ใหม่ขึ้น ซึ่งการแก้ไขอะไรก็ตาม จะไม่กระทบเวอร์ชันเดิมใน branch master เมื่อแก้ไขเสร็จแล้ว และต้องการจะเอากลับมารวมกันก็สามารถทำได้

New branch จะมีไฟล์ทั้งหมดที่ commit มาจาก Master และมีการ commit ใน New branch จะไม่ส่งผลกับ Master
วิธีการดูว่าตอนนี้เรามี branch อะไรบ้าง และจะมี
*(asterisk) อยู่หน้าชื่อ branch ที่กำลังทำงานอยู่ ทำได้โดย$ git branch * masterสร้าง branch ใหม่ ชื่อ goodbye โดยใช้คำสั่ง
git branch new_branch_name$ git branch goodbyeสลับไปใช้งาน branch ใหม่ โดย
git checkout branch_name$ git checkout goodbye M greeting.txt Switched to branch 'goodbye' $ git branch * goodbye masterทดสอบสร้างไฟล์ใหม่ และ
commitดู$ echo "me: See ya later." > goodbye.txt $ git add goodbye.txt $ git commit -m "Add goodbye.txt to repository" [goodbye f215b31] Add goodbye.txt to repository 1 file changed, 1 insertion(+) create mode 100644 goodbye.txtลองดูจาก log เทียบกันระหว่าง 2 branch ดู จะพบว่า
goodbye.txtจะมีอยู่แต่ใน branch ชื่อ goodbye เท่านั้น ส่วนใน master ไม่มีอะไรเปลี่ยนแปลง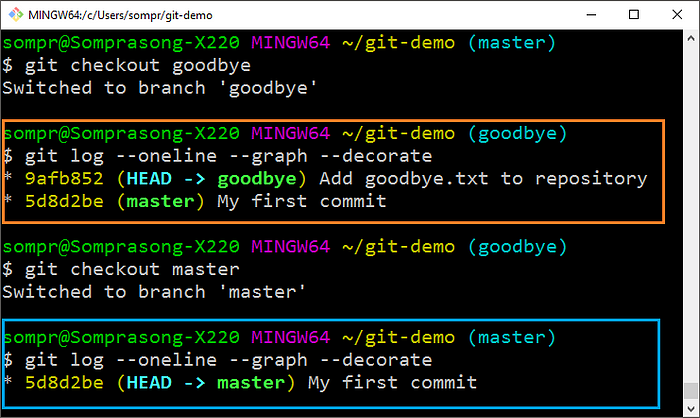
แต่ถ้าต้องการรวม branch goodbye เข้าไปใน master ให้สลับกลับมาอยู่ master ก่อน จากนั้นใช้คำสั่ง
git merge branch_name$ git checkout master Switched to branch 'master' $ git merge goodbye Updating 5d8d2be..9afb852 Fast-forward goodbye.txt | 0 1 file changed, 0 insertions(+), 0 deletions(-) create mode 100644 goodbye.txt $ git log --oneline --graph --decorate * 9afb852 (HEAD -> master, goodbye) Add goodbye.txt to repository * 5d8d2be My first commitเมื่อลองดูจากลอง
commit 9afb852ของ branch goodbye จะถูกรวมเข้ากับ master เรียบร้อยแล้วแต่ถ้ามีการแก้ไขไฟล์จาก master และได้ทำการ
commitไปก่อนที่จะทำการ merge และใน goodbye branch ก็มีการแก้ไขไฟล์เดียวกันด้วย เมื่อสั่ง merge Git จะไม่ทราบว่าเราจะเอาเวอร์ชันไหนกันแน่ สิ่งนี้เรียกว่า Merge Conflict# add new line with "Bye from master version" $ npp goodbye.txt $ git add . $ git commit -m "Add respone from master branch" [master f93dc63] Add respone from master branch 1 file changed, 1 insertion(+) $ git checkout goodbye Switched to branch 'goodbye' # add new line with "Bye from goodbye version" $ npp goodbye.txt $ git add . $ git commit -m "Add response from goodbye branch" [goodbye f44d780] Add response from goodbye branch 1 file changed, 1 insertion(+) $ git checkout master Switched to branch 'master' $ git merge goodbye Auto-merging goodbye.txt CONFLICT (content): Merge conflict in goodbye.txt Automatic merge failed; fix conflicts and then commit the result.เมื่อลองเปิดไฟล์ดูข้างใน
notepad++ goodbye.txtจะข้อความแปลกๆ แบบนี้me: See ya later <<<<<<< HEAD git: Bye from master version ======= git: Bye from goodbye version >>>>>>> goodbyeคือ Git จะไม่รู้ว่าเราต้องการเก็บข้อมูลชุดไหนไว้กันแน่ โดยจะมี Git’s special markings บอกเอาไว้ว่าข้อความของ
masterbranch จะอยู่ระหว่าง<<<<<<< HEADกับ=======ส่วนของgoodbyebranch อยู่ระหว่าง=======กับ>>>>>>ซึ่งเราต้องแก้ไขเองว่าจะเอาข้อความไหน และต้องลบ Git’s special markings ออกด้วย เมื่อแก้ไข conflict เสร็จแล้วก็สั่ง add เข้า staging area และ commit เก็บไว้สุดท้ายเมื่อเรา merge branch ที่เราแยกออกไปเสร็จแล้ว หรือไม่ต้องการ branch นั้นๆ แล้ว ก็สามารถลบทิ้งได้ โดยใช้คำสั่ง
git branch -d branch_name$ git branch -d goodbye Deleted branch goodbye (was f44d780).
4. Git Remote Repository
จากที่ศึกษาวิธีการใช้ Git มาจากข้างต้นนั้นจะเป็นการใช้งานแบบ single user บน local repository ที่อยู่บนเครื่องใครเครื่องมัน แต่ Git นั้นจัดเป็น collaboration tool ตัวนึงที่ทำให้เราทำงานร่วมกับผู้อื่นในโปรเจคได้ง่ายขึ้น โดยผ่าน remote repository เช่น GitHub หรือ Bitbucket ซึ่งจะเป็นตัวกลางในการทำ pulling หรือ pushing งานในโปรเจคที่ทำร่วมกัน
ตัวอย่างสร้าง remote repository อยู่บน GitHub ชื่อ github-demo
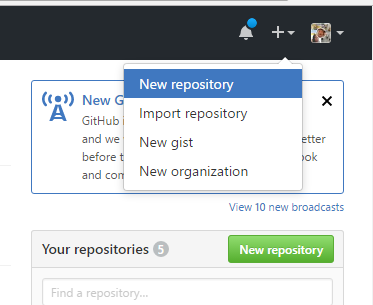
- ล็อกอินเข้า GitHub เลือกเครื่องหมาย + ข้างๆ รูปโปรไฟล์ แล้วเลือกเมนู New repository
- ตั้งชื่อ Repository name และเลือก
Initialize this repository with a READMEเพื่อสร้างไฟล์README.mdกดปุ่ม Create repository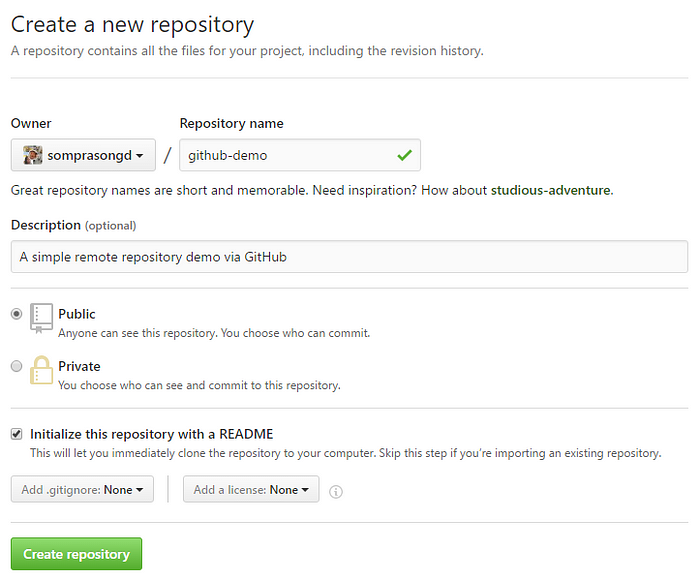
เมื่อได้ remote repository มาแล้ว ก็ให้ ‘clone’ มาไว้ที่เครื่องของเรา โดยใช้คำสั่ง git clone remote_location clone_name ซึ่ง remote_location คือที่อยู่ของ remote repository และ clone_name คือชื่อไดเรกทอรีที่จะให้บันทึก แต่ถ้าไม่ระบุ Git จะสร้างไดเรกทอรีชื่อเดียวกับชื่อของ repository ให้อัตโนมัติ
$ git clone git@github.com:somprasongd/github-demo.git
Cloning into 'github-demo'...
remote: Counting objects: 3, done.
remote: Compressing objects: 100% (2/2), done.
remote: Total 3 (delta 0), reused 0 (delta 0), pack-reused 0
Receiving objects: 100% (3/3), done.$ cd github-demo$ ls -a
./  ../  .git/  README.md
สิ่งที่ Git ทำอยู่เบื้องหลังเมื่อเรา clone โปรเจคมา คือ Git จะสร้าง remote address ขึ้นมาชื่อ origin เพื่อความสะดวกในการอ้างอิงถึง remote repository โดยใช้เพียงแค่ชื่อ ถ้าต้องการจะดูว่าใน Git project ของเรามีรายการ remotes อะไรบ้าง ใช้คำสั่ง git remote -v จากในไดเรกทอรีของ Git project
$ git remote -v
origin  git@github.com:somprasongd/github-demo.git (fetch)
origin  git@github.com:somprasongd/github-demo.git (push)
หลังจากที่เรา clone โปรเจคมานานแล้ว และไม่ทราบว่าทางฝั่ง remote นั้นมีการเปลี่ยนแปลงอะไรเกิดขึ้นแล้วบ้าง เราสามารถตรวจสอบได้โดยใช้คำสั่ง git fetch
- แก้ไขไฟล์
README.mdที่ GitHub โดยเพิ่มข้อความในบรรทัดใหม่ว่าThis line from remote repository.
- ดึงข้อมูลจากฝั่ง remote ว่ามีการเปลี่ยนแปลงอะไรเกิดขึ้นบ้าง
$ git fetch remote: Counting objects: 3, done. remote: Compressing objects: 100% (2/2), done. remote: Total 3 (delta 0), reused 0 (delta 0), pack-reused 0 Unpacking objects: 100% (3/3), done. From github.com:somprasongd/github-demo 4fae075..9595d50 master -> origin/master - ตรวจสอบด้วย
git statusจะได้ข้อความดังนี้$ git status On branch master Your branch is behind 'origin/master' by 1 commit, and can be fast-forwarded. (use "git pull" to update your local branch) nothing to commit, working tree clean - หมายความว่าบน local ( branch master)นั้นตามหลังบน remote (
branch origin/master) อยู่ 1 commit ซึ่งเราสามารถรวมโค้ดจาก remote มายัง local ได้ด้วยวิธีเดียวกันกับการรวมโค้ดจาก branch อื่น โดยใช้คำสั่งgit mergeโดยระบุชื่อ branch เป็นorigin/master$ git merge origin/master Updating 4fae075..9595d50 Fast-forward README.md | 2 ++ 1 file changed, 2 insertions(+)$ cat README.md # github-demo A simple remote repository demo via GitHubThis line from remote repository.
ต่อมาเมื่อเรามีการแก้ไขจากฝั่ง local และต้องการจะส่งไปเก็บไว้ที่ฝั่ง remote ด้วย ทำได้โดยใช้คำสั่ง git push remote_alias_name branch_name เช่น git push -u origin master
u: เอาไว้จำ parameter origin master ครั้งต่อๆ ไปก็พิมพ์แค่git pushorigin: คือ ชื่อ alias ของ remote (github)master: คือ ชื่อ branch ที่เราต้องการ push ขึ้นไป
$ echo -e "\nThis line from local repository" >> README.md$ git add .$ git commit -m "Update README.md from local"
[master 395d3f6] Update README.md from local
 1 file changed, 2 insertions(+)$ git push -u origin master
Counting objects: 3, done.
Delta compression using up to 4 threads.
Compressing objects: 100% (2/2), done.
Writing objects: 100% (3/3), 320 bytes | 0 bytes/s, done.
Total 3 (delta 1), reused 0 (delta 0)
remote: Resolving deltas: 100% (1/1), completed with 1 local objects.
To github.com:somprasongd/github-demo.git
   9595d50..395d3f6  master -> master
Branch master set up to track remote branch master from origin.
- เมื่อลองไปดูจาก GitHub จะเห็นว่าไฟล์
README.mdจะถูกอัพเดทแล้ว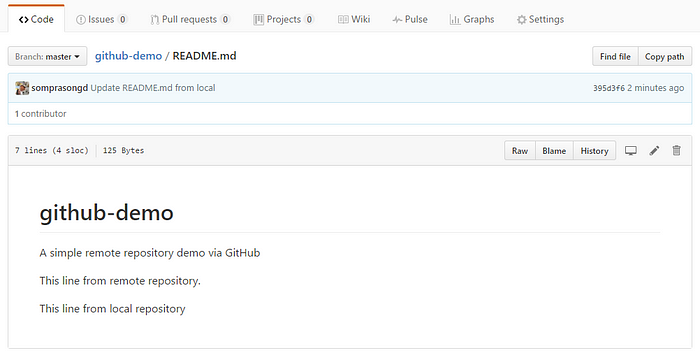
5. Stashing
คือการบันทึกโปรเจคของเรา และซ่อนเอาไว้ เมื่อจะใช้ก็สั่ง restore กลับมาได้ตลอดเวลา เช่น กรณีที่เรากำลังแก้ไขไฟล์อยู่ และจำเป็นต้องสั่ง commit โปรเจคนี้ แต่ไฟล์นี้ยังแก้ไขไม่เสร็จเลยไม่ต้องการ commit ในครั้งนี้ด้วย ก็ใช้ stash เพื่อซ่อนไฟล์นี้เอาไว้ก่อน เมื่อได้ commit เสร็จแล้ว ก็สั่ง restore ไฟล์ที่ซ้อนไว้กลับมา แก้ไขจนเสร็จ แล้วค่อย commit ใหม่
git stash: สั่งซ้อนไฟล์git stash list: แสดงรายการที่ซ้อนไว้ โดยรายการล่าสุดจะอยู่ที่stash@{0}git stash pop: สั่ง restore รายการล่าสุดกลับมา
# edit README.md file
$ echo -e "\nGit stashing demo line." >> README.md

# show git status, see README.md modified.
$ git status
On branch master
Your branch is up-to-date with 'origin/master'.
Changes not staged for commit:
  (use "git add <file>..." to update what will be committed)
  (use "git checkout -- <file>..." to discard changes in working directory)modified:   README.mdno changes added to commit (use "git add" and/or "git commit -a")

# use git stash to hide modified README.md
$ git stash
Saved working directory and index state WIP on master: 395d3f6 Update README.md from local
HEAD is now at 395d3f6 Update README.md from local

# show list of stash
$ git stash list
stash@{0}: WIP on master: 395d3f6 Update README.md from local

# show git status, see nothing to commit.
$ git status
On branch master
Your branch is up-to-date with 'origin/master'.
nothing to commit, working tree clean

# create new text file
$ touch somefile.txt

# add text file to staging area
$ git add somefile.txt

# commit new text file, not include modified README.md
$ git commit -m "Add some text file"
[master 6fe9c68] Add some text file
 1 file changed, 0 insertions(+), 0 deletions(-)
 create mode 100644 somefile.txt

# show git status, see nothing to commit.
$ git status
On branch master
Your branch is ahead of 'origin/master' by 1 commit.
  (use "git push" to publish your local commits)
nothing to commit, working tree clean

# restore README.md and remove it from stashing
$ git stash pop
On branch master
Your branch is ahead of 'origin/master' by 1 commit.
  (use "git push" to publish your local commits)
Changes not staged for commit:
  (use "git add <file>..." to update what will be committed)
  (use "git checkout -- <file>..." to discard changes in working directory)modified:   README.mdno changes added to commit (use "git add" and/or "git commit -a")
Dropped refs/stash@{0} (5c131b45b0be6e0af3b06b47282149d7dd904678)

# show list of stash again, see nothing
$ git stash list

# view data in README.md
$ cat README.md
# github-demo
A simple remote repository demo via GitHubThis line from remote repository.This line from local repositoryGit stashing demo line.

# add modified README.md to staging area
$ git add README.md

# commit README.md
$ git commit -m "Update README.me with stash demo"
[master b1e16ac] Update README.me with stash demo
 1 file changed, 2 insertions(+)
6. Tagging
ก่อนที่จะทำการ release ระบบออกไปนั้น แนะนำให้ทำการสร้าง tag หรือ ป้ายชื่อ เพื่อบอกให้รู้ว่าเรากำลังทำอะไร อยู่ตรงไหน
git tag tag_name SHA→ สร้าง tag ขึ้นมาใน commit ที่ระบุ ถ้าไม่ระบุจะเป็นHEADcommitgit tag --list→ แสดงรายการชื่อ tag ทั้งหมดgit tag -d tag_name→ สั่งลบจากชื่อ tag ที่ระบุgit show tag_name→ แสดงรายละเอียด commit จากชื่อ tag ที่ระบุgit tag -a tag_name -m "message"→ สร้าง tag แบบระบุข้อความบอกว่า tag นี้คืออะไร ซึ่งเมื่อใส่git show tag_nameจะแสดงข้อความจากmขึ้นมาให้ด้วย
# create new tag
$ git tag my_tag

# show git log, see my_tag at HEAD commit
$ git hist
* b1e16ac (HEAD -> master, tag: my_tag, origin/master, origin/HEAD) Update README.me with stash demo
* 6fe9c68 Add some text file
* 395d3f6 Update README.md from local
* 9595d50 Update README.md
* 4fae075 Initial commit

# show commit detail via tag name
$ git show my_tag
commit b1e16acec97bc597ecca1cefe3d227c7664541a6
Author: Somprasong Damyos <somprasong@git.com>
Date:   Fri Feb 17 16:59:36 2017 +0700Update README.me wiht stash demodiff --git a/README.md b/README.md
index 6cc2788..442636f 100644
--- a/README.md
+++ b/README.md
@@ -4,3 +4,5 @@ A simple remote repository demo via GitHub
 This line from remote repository.This line from local repository
+
+git stash demo line.

# show all tag name
$ git tag --list
my_tag

# delete tag
$ git tag -d my_tag
Deleted tag 'my_tag' (was b1e16ac)

# show all tag name, see nothing
$ git tag --list

# create new tag with information use -a flag
$ git tag -a v-1.0 -m "Release version 1.0"

# show commit detail via tag name and include tag information
$ git show v-1.0
tag v-1.0
Tagger: Somprasong Damyos <somprasong@git.com>
Date:   Fri Feb 17 17:58:50 2017 +0700Release version 1.0commit b1e16acec97bc597ecca1cefe3d227c7664541a6
Author: Somprasong Damyos <somprasong@git.com>
Date:   Fri Feb 17 16:59:36 2017 +0700Update README.me wiht stash demodiff --git a/README.md b/README.md
index 6cc2788..442636f 100644
--- a/README.md
+++ b/README.md
@@ -4,3 +4,5 @@ A simple remote repository demo via GitHub
 This line from remote repository.This line from local repository
+
+git stash demo line.
7. Remove
git rm filename→ สั่งลบไฟล์ และสั่งให้ Git ทำการuntrackedไฟล์ด้วยgit rm --cached filename→ สั่งลบไฟล์ออกจาก Git repository เฉยๆ ไม่ได้ลบไฟล์จริงใน working directory ออกด้วย
สรุป
บทความนี้จะพูดถึงการใช้งาน Git ผ่าน Command Line เพื่อต้องการให้เกิดความใจว่า Git นั้นทำงานอย่างไร แต่ละขั้นตอนใช้คำสั่งอะไรบ้าง เมื่อเปลี่ยนไปใช้ Git แบบ GUI เช่น SourceTree หรือ GitHub Desktop จะได้จะรู้ว่าการทำงานของมันมีที่มาที่ไปอย่างไร แต่สุดท้ายเราจะเลือกใช้งานแบบ Command Line หรือ GUI ก็แล้วความถนัดของเราครับ