- Published on
ทำ Authentication ด้วย Nginx auth_request โมดูล
- Authors

- Name
- Somprasong Damyos
- @somprasongd
ทำ Authentication ด้วย Nginx auth_request โมดูล
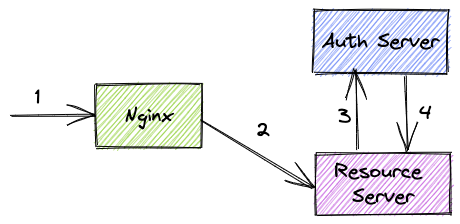
ถ้าเรามี auth server และ resource server แยกออกจาก การที่เราจะป้องกันการเข้าถึง resource server นั้น วิธีการหนึ่งที่ใช้กัน คือ การเพิ่มโค้ดส่วนการทำ authentication เข้าไปในทุกๆ resource server ให้เรียกยัง auth server เพื่อทำการตรวจสอบ และรับผลลัพธ์การตรวจสอบมาทำงานต่อเอง แบบนี้
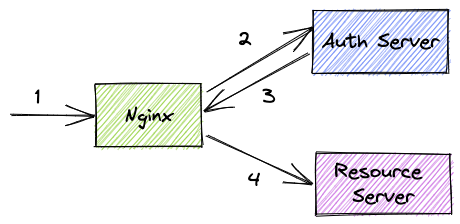
แต่เนื่องจากเราใช้ Nginx เป็น reverse proxy อยู่แล้ว ในบทความนี้จะมาแนะนำการใช้โมดูล auth_request ของ Nginx มาช่วยการทำ Authentication ให้แทน
โมดูล auth_request
วิธีการทำงานของโมดูลนี้ คือ มันมี request เข้ามายัง location ที่เราระบุไว้ Nginx จะทำการสร้าง HTTP subrequest ขึ้นมาเพื่อเรียกไปยัง auth server ของเรา โดยใช้ directives 2 ตัว คือ
- auth_request - ใช้สำหรับระบุ URI ของ subrequest
- auth_request_set - ใช้สำหรับสร้าง request variable หลังที่ authentication สำเร็จ จากตัวแปร
$upstream_http_*
และเมื่อ auth server ตอบกลับมาจะทำการตรวจสอบจาก HTTP response code ของ subrequest นั้น ดังนี้
2xx- จะอนุญาตเข้าถึง request ที่เรียกเข้ามาได้401, 403- จะไม่อนุญาตเข้าถึง request ที่เรียกเข้ามา- สถานะอื่นๆ จะแสดงเป็น 500 Internal Server Error แทน
วิธีการใช้งาน
- กรณีใช้ Nginx เวอร์ชัน Open Source ให้ทำการตรวจสอบการว่ามีการติดตั้งโมดูล
with-http_auth_request_moduleแล้วหรือไม่ โดยการรันคำสั่งนี้
nginx -V 2>&1 | grep -- 'http_auth_request_module'
ให้ดูว่าในข้อความที่แสดงนั้นมี --with-http_auth_request_module อยู่ด้วยหรือไม่
- สร้าง subrequest ใน request ที่ต้องการทำ authentication โดยใช้ directive auth_request
location /private/ {
  auth_request /auth;
  #...
}
จะทำให้ทุกครั้งที่เรียกมาที่ /private จะมีการสร้าง subrequest ส่งไปที่ /auth location
- สร้าง
/authซึ่งจะสร้างเป็น internal location และใช้ directive proxy_pass ไปยัง authentication server หรือ service ของเรา
location = /auth {
  internal;
  proxy_pass http://auth-server;
  #...
}
- เนื่องจาก default จะ proxy_pass ไปยัง http://auth-server ด้วย method
GETดังนั้นไม่ต้องใช้ request body ในการ authentication ให้ปิดโดยใช้ directive proxy_pass_request_body กำหนดค่าเป็น off แล้วให้ Content-Length เป็นค่าว่าง
location = /auth {
  internal;
  proxy_pass              http://auth-server;
  proxy_pass_request_body off;
  proxy_set_header        Content-Length "";
  #...
}
- ถ้าต้องการส่ง original request URI ที่เรียกเข้าไปด้วย เช่น เอาไปทำ authorization ว่า user สามารถใช้งาน url นี้ได้หรือไม่ สามารถส่งไปได้โดยใช้ directive proxy_set_header
location = /auth {
  internal;
  proxy_pass              http://auth-server;
  proxy_pass_request_body off;
  proxy_set_header        Content-Length "";
  proxy_set_header        X-Original-URI $request_uri;
}
- เมื่อ authen ผ่านแล้ว เราสามารถส่งค่าต่อไปยังไปยัง request จริงของเราได้ โดยใช้ directive auth_request_set มาสร้างตัวแปรใหม่ขึ้นก่อน แล้วค่อยส่งต่อไป เช่น ส่ง username ไป
location /private/ {
  auth_request        /auth;
  # สร้างตัวแปรใหม่
  auth_request_set $auth_user $upstream_auth_user;
  # ส่งต่อไปทาง header
  proxy_set_header  X-User $auth_user;
}
นำมาใช้งานจริง
สมมุติว่าเรามี auth server และ resource server ดังนี้
auth server เอาไว้สำหรับการ signin เพื่อสร้าง token และ verify token
const app = express()
// สร้าง jwt สำหรับ admin หรือ user
app.post('/api/auth/signin', (req, res) => {
  const isAdmin = req.query.isAdmin === 'true'
  const token = jwt.sign(
    {
      id: 1,
      username: isAdmin ? 'admin' : 'user',
      isAdmin,
    },
    secret
  )
  res.json({ token })
})
// จะทำการตรวจสอบ jwt และส่งข้อมูล user เป็น base64 ไปทาง X-Id-Token
app.get('/api/auth/verify', (req, res) => {
  const token = req.headers.authorization ? req.headers.authorization.split(' ') : undefined
  if (!token || token.length < 2) return res.sendStatus(401)
  const user = jwt.verify(token[1], secret)
  res.set('X-Id-Token', Buffer.from(JSON.stringify(user)).toString('base64'))
  res.sendStatus(200)
})
resource server จะมีการเอา user มาใช้งาน ซึ่งจะได้มาจากการ authen ผ่าน Nginx และส่งค่ามากับ
X-Id-Tokenconst app = express() // ใช้ middleware ในการ decode ข้อมูล user app.use((req, res, next) => { const idToken = req.headers['x-id-token'] if (!idToken) return res.sendStatus(401) const decoded = Buffer.from(idToken, 'base64').toString('ascii') const user = JSON.parse(decoded) req.user = user next() }) // เฉพาะ role admin เท่านั้น app.get('/api/resource/admin', (req, res) => { const user = req.user if (!user.isAdmin) return res.sendStatus(403) res.json({ message: `User "${user.username}" can access admin` }) }) app.get('/api/resource/private', (req, res) => { const user = req.user res.json({ message: `User "${user.username}" can access private` }) })
ซึ่งเราจะเขียน nginx config ได้แบบนี้
upstream auth-api {
  server auth:3000;
}

upstream private-api {
  server private:3002;
}

server {
  listen       80;
  listen  [::]:80;
  server_name  _;

  # กำหนดให้ path verify ไม่สามารถเข้าจากภายนอกได้
  location ~ /api/auth/verify {
    deny all; # จะ return 403 กลับไป
  }

	# สำหรับ signin
  location ~ ^/(api/auth) {
    proxy_pass http://auth-api;

    proxy_redirect off;
    proxy_cache_bypass $http_upgrade;
    proxy_set_header Host $http_host; # proxy_set_header  Host $host;
    proxy_set_header X-NginX-Proxy true;
    proxy_set_header X-Real-IP $remote_addr;
    proxy_set_header X-Forwarded-For $proxy_add_x_forwarded_for;
    proxy_set_header X-Forwarded-Proto $scheme;
    proxy_set_header X-Forwarded-Host $server_name;
  }

  # สำหรับ auth_request
  location /auth-verify {
    internal;

    proxy_pass        http://auth-api/api/auth/verify;

    proxy_redirect    off;
    proxy_pass_request_body off;
    proxy_set_header Content-Length "";
    proxy_set_header X-Original-URI $request_uri;
    proxy_set_header Host $http_host;
    proxy_set_header X-Real-IP $remote_addr;
    proxy_set_header X-Forwarded-For $proxy_add_x_forwarded_for;
    proxy_set_header X-Forwarded-Proto $scheme;
    proxy_set_header X-Forwarded-Host $server_name;
  }

  # ทุกครั้งที่เรียกมาที่นี่จะสร้าง subrequest ส่งไปยัง /auth-verify
  location ~ ^/(api/resource) {
    auth_request /auth-verify;
    # เอา x-id-token จาก subrequest มาส่งต่อ
    auth_request_set $x_id_token $upstream_http_x_id_token;

    proxy_pass http://private-api;

    proxy_redirect off;
    proxy_cache_bypass $http_upgrade;
    proxy_set_header Host $http_host; # proxy_set_header  Host $host;
    proxy_set_header X-NginX-Proxy true;
    proxy_set_header X-Real-IP $remote_addr;
    proxy_set_header X-Forwarded-For $proxy_add_x_forwarded_for;
    proxy_set_header X-Forwarded-Proto $scheme;
    proxy_set_header X-Forwarded-Host $server_name;
    proxy_set_header X-Id-Token $x_id_token; # ส่งไปกับ Header
  }

}
ทดสอบ
$ curl -XPOST \
'http://localhost:8800/api/signin'

{"token":"eyJhbGciOiJIUzI1NiIsInR5cCI6IkpXVCJ9.eyJpZCI6MSwidXNlcm5hbWUiOiJ1c2VyIiwiaXNBZG1pbiI6ZmFsc2UsImlhdCI6MTY2MTE3Nzg5NX0.rgcxfF00ck6zzYl4clNJBSPnDgrMVRYdlfl6E11nUKU"}

$ curl -XGET \
'http://localhost:8800/api/resource/private' \
-H "Authorization: Bearer eyJhbGciOiJIUzI1NiIsInR5cCI6IkpXVCJ9.eyJpZCI6MSwidXNlcm5hbWUiOiJ1c2VyIiwiaXNBZG1pbiI6ZmFsc2UsImlhdCI6MTY2MTE3Nzg5NX0.rgcxfF00ck6zzYl4clNJBSPnDgrMVRYdlfl6E11nUKU"

{"message":"User \"user\" can access private"}
เพียงเท่านี้เราก็สามารถทำ authentication ผ่าน nginx ได้แล้ว
การจัดการ Error
เนื่องจากการใช้งานโมดูล auth_request ถ้า auth server ของเราไม่ได้ส่ง status code กลับมาเป็น 2xx ตัว nginx จะแสดง error ออกมาเป็นหน้า HTML ไม่ว่า auth server จะตอบกลับเป็นรูปแบบอื่นก็ตาม
$ curl -XGET \
'http://localhost:8800/api/resource/private' \
-H "Authorization: Bearer invalid_token"

<html>
<head><title>401 Authorization Required</title></head>
<body>
<center><h1>401 Authorization Required</h1></center>
<hr><center>nginx/1.23.1</center>
</body>
</html>
ซึ่งถ้าเราต้องการเป็นรูปแบบ JSON สามารถทำได้ดังนี้
server {

+ location @errorAuth401 {
+   default_type application/json;
+   return 401 '{"status":"401","error":{"code": 401,"message": "the token is invalid or expired"}}';
+ }

+ location @errorAuth403 {
+   default_type application/json;
+   return 403 '{"status":"403","error":{"code": 403,"message": "forbidden"}}';
+ }

+ location @errorAuth500 {
+   default_type application/json;
+   return 403 '{"status":"500","error":{"code": 500,"message": "unexpected error"}}';
+ }

  # ทุกครั้งที่เรียกมาที่นี่จะสร้าง subrequest ส่งไปยัง /auth-verify
  location ~ ^/(api/resource) {
    auth_request /auth-verify;

+   # จัดการ error
+   error_page 401 = @errorAuth401;
+   error_page 403 = @errorAuth403;
+   error_page 500 = @errorAuth500;

    # เอา x-id-token จาก subrequest มาส่งต่อ
    auth_request_set $x_id_token $upstream_http_x_id_token;

    proxy_pass http://private-api;

    proxy_redirect off;
    proxy_cache_bypass $http_upgrade;
    proxy_set_header Host $http_host; # proxy_set_header  Host $host;
    proxy_set_header X-NginX-Proxy true;
    proxy_set_header X-Real-IP $remote_addr;
    proxy_set_header X-Forwarded-For $proxy_add_x_forwarded_for;
    proxy_set_header X-Forwarded-Proto $scheme;
    proxy_set_header X-Forwarded-Host $server_name;
    proxy_set_header X-Id-Token $x_id_token; # ส่งไปกับ Header
  }

}
ทดสอบ error
$ curl -XGET \
'http://localhost:8800/api/resource/private' \
-H "Authorization: Bearer invalid_token"

{"status":"401","error":{"code": 401,"message": "the token is invalid or expired"}}
สรุป
วิธีการใช้โมดูล auth_request นั้น ช่วยให้เราไม่ต้องไปเขียนโค้ดในการเรียกไปยัง auth server เองในทุกๆ resource server ของเรา ซึ่งช่วยลดภาระงานไปได้ส่วนหนึ่ง และถ้าเราต้องการเพิ่มการทำ authorization ก็ทำได้ เพราะได้มีการส่ง url ของ request ปลายทางไปให้แล้ว แค่เพิ่มโค้ดตรวจสอบ permission เข้าไป ทำให้ตัดโค้ดส่วนนี้ออกจาก resource server ของเราออกไปได้อีกด้วย
สามารถดูโค้ดทั้งหมดได้ที่นี่